This is the sixth edition of my SHIMS blog. If you would like to look at previous editions, you can find them at: Ed’s SHIMS Blog.
In this edition we have Top Mods, Really New Stuff, and Tech Corner sections.
There are a lot of changes happening in the SHIMS world these days and I thought you might find some of them interesting.
So here goes.
Top Mods
You may still want to keep printed copies of end of month reports as backup, but most reports can be viewed and used more effectively online.
On a PC in a Windows application, when you ask for a report, it normally displays on your screen and then you have options from that point:

I have created a VIEW program that does the same thing for SHIMS. This provides a lot of flexibility in managing on-demand reports. Why print a report when you can find what you want on the screen, or email it, or download it to your PC?
Modifying an existing menu item to work with VIEW usually only takes a few minutes. You just insert the name of the program you want to run into View and then it does everything else.
You can either do this yourself, or for a minimal charge, I can do it for you.
If you are interested in how to make a program work with VIEW, here is some information.
For my first customer, the on-demand prok she had been running was:

So I gave her a new prok EXEC Z.DAILY-CASH-REC.VIEW that looks like this:
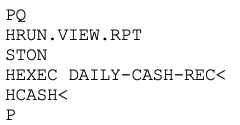
That was the only change required for this modification.
A VIEW prok always begins with the same 3 lines as above.
On line 4 you put the tcl command that runs the report — preceded by an H and with a trailing < as above.
Line 5 is just a name you give the file you would download or email. Be sure to precede the name with an H.
Do not use special characters like & in the name.
Line 6 is always a P.
There are 2 situations that require special handling:
– A program that controls its own printer assignment. In other words, it does not just print wherever you are assigned to print.
– A program cannot print more than one report.
Although not many programs have these issues, the ‘below order point’ and ‘below line point’ programs suffer from both. If you need VIEW to work with either of those, you may need to contact me for additional help.
Really New Stuff
Warehouse Management Software (WMS) – Part Two –
Indago WMS is sold by JMO systems (www.jmosystems.com).
I spoke with Frank Collacchi of Northeastern Supply about this WMS system which they recently implemented.
Frank had some very valuable insight as he previously used a version of the WMS package that I discussed in my earlier blog post.
The top five features for Northeastern offered by Indago WMS were:
- On-hand by bin location. SHIMS knows that you have 10 widgets on-hand. Indago knows that of those 10, 5 are in bin ABC123, 2 are in DEF456 and the last 3 are in XYZ789. As a result, it has information to allow for more efficient picking.
- Cross docking. If you receive 10 widgets and 3 are committed to customer orders, it tells you to put 7 away and to put the other 3 in the cross-docking area.
- If your vendor can send you ASNs for what you are being sent, those can be forwarded to Indago. Then Indago knows what you should be receiving and can capture errors.
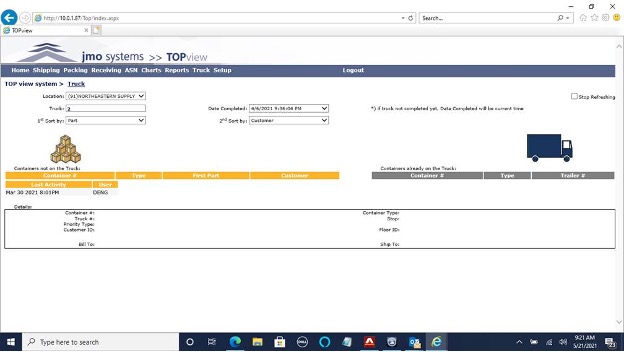
- The TopView screen. This captures the status of your warehouse activities. Are you getting behind in picking in zone A? You will see that here. This seemed like a powerful tool for staying ahead of potential problems.
- A kind of ledger card showing the movement of a product within your warehouse. This shows picking and packing, with user, tote and transfer as well as what times each process occurred.
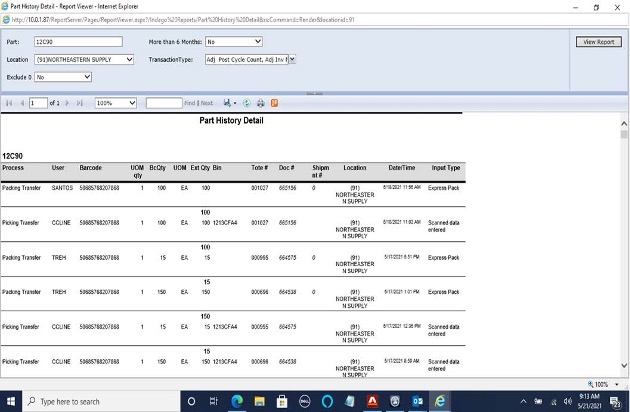
These are all features that were not included in the previous version of the WMS system used by Northeastern.
Of course, this is only a summary and does not capture all the differences between the WMS systems. An in-depth demonstration is the best way to gain an appreciation for the differences between the systems.
In my opinion, the Indago WMS works very well with SHIMS and offers many advantages and benefits.
Tech Corner
If you or someone at your company are making changes to Basic programs in SHIMS, here is some advice from someone who has been doing this for over 30 years.
Programmers need to keep two things in mind:
– It is likely that the programs being modified will be modified again in the future.
– There is a high probability that someone else will be making those modifications.
Here are some suggestions on making it easier for that ‘next person’.
—
In this post I am going to discuss the MOD.INCL file.
The MOD.INCL file is like the IBP file. A MOD.INCL is included in another program and that other program is compiled and run.
Here is an example from BP CUS-MA:
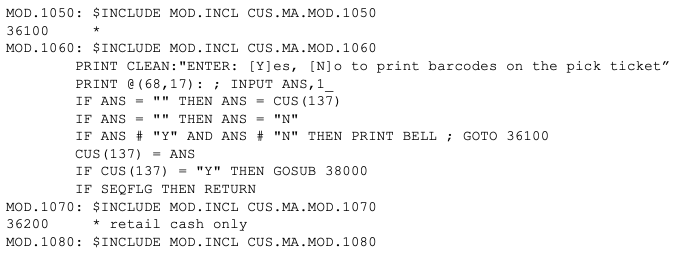
As you can see there are lots of MOD.INCLs in this program. There is a MOD.INCL both before and after every label (like 36100 and 36200) – and there are a lot of labels.
The idea here is that programmers would put their mods into the MOD.INCL items and, as a result, would not need to put their changes into the program itself. In the ideal case, no BP would ever be copied to the CBP file.
A great idea, but without doing something which causes more problems than it fixes (to be discussed below) there aren’t enough MOD.INCLs to put all the mods into them. Sometimes your mod needs to go between two adjacent MOD.INCLs.
One of the first things you need to look at if you want to understand a program is which MOD.INCLS are in use. (Most of them do not have any code inside of them so they don’t do anything.)
Here is a program you can load and compile on your system that will tell you this:
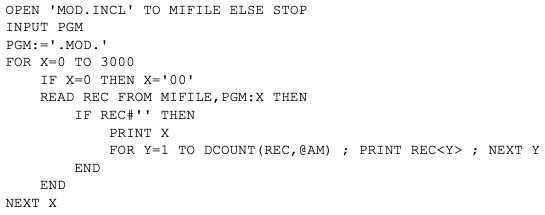
I can help you with loading this, but if I have worked on your system in the past then this is probably already on your system. To run it and find the MOD.INCLS that in use in BP CUS-MA-INQ, you would enter

And then enter

At the prompt. You will then see something like this:
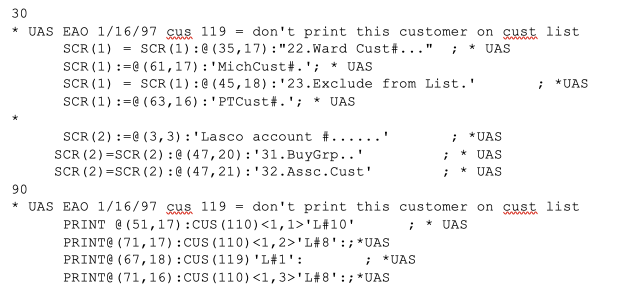
So cus.ma.inq.mod.30 and cus.ma.mod.90 are in use, and it is easy to see that they handle a mod that added four new fields (Ward Cust# being the first one) to what is displayed by this program.
I think this is a proper use of a MOD.INCL. It just adds to what the program already does.
One thing to notice is that the program is CUS-MA-INQ but the MOD.INCLs all begin CUS.MA.INQ, so I entered CUS.MA.INQ not CUS-MA-INQ at the prompt.
There are a few exceptions to this convention. One example is that the first MOD.INCL in CUS-MA is named CUS-MA.MOD.00 while all the others begin CUS.MA, not CUS-MA.
You may find on your system, however, examples where a huge chunk of code from the BP is copied into a MOD.INCL and modified. Something like this:

Obviously, using this method, you could attain the goal of never modifying a BP.
But I have wasted tons of time trying to figure out why something does not work only to discover that the code I was testing wasn’t even being used because of this programming method.
When it comes to MOD.INCLs and the ‘next guy’, do not ever copy standard code into a MOD.INCL. The next guy will thank you.
—
I will continue with the CBP file in another blog post.
If you have some tech questions you would like answered, please let me know and I will be happy to help.
Thanks,
Ed
Zumasys Disclaimer:
This blog is for educational purposes only. Zumasys makes no representation, express or implied warranty, or guarantee about completeness, accuracy, or usefulness. By using the information, you agree it is your sole responsibility to independently determine the suitability of the information for your particular situation and you agree that neither Zumasys nor its agents will be liable for any damages arising from or related in any way to the information.
The content in this blog is the intellectual property of Zumasys and you may not reuse, republish, or reprint the content without the prior written consent of Zumasys. All third party trademarks remain the property of their respective owners. Unless specifically stated, the use of such trademarks does not indicate any relationship, sponsorship, or endorsement.

